Page 4 of 48
It had to happen. First tow
Posted: Thu Oct 22, 2015 7:09 am
by songzunhuang
I haven't had to have a car towed in over 25 years. That all changed today with the e24. As I was driving home from work over a mountain road, the motor just stopped running and I coasted to a stop on the side of a narrow freeway. It was quite a precarious position.
I think my fuel pump died. When I turn the key, I can't hear it anymore. It used to be a bit loud.
So it looks like a weekend full of fuel system troubleshooting. I hope it's just the fuel pump. The fuse #11 (15A) looks fine. Anything else I should check?
I have ordered a new pressure regulator and some more fuel lines for good measure.
Posted: Thu Oct 22, 2015 8:05 am
by sansouci
If you have a choice, flat bedding is the way to go.
No choice in the tow.
Posted: Sun Oct 25, 2015 2:25 am
by songzunhuang
sansouci wrote:If you have a choice, flat bedding is the way to go.
Although I appreciate the tip, there wasn't much of a choice. The tow driver did an excellent job though. My car was positioned on a narrow mountain freeway with little room to maneuver. The driver first towed my car by lifting the front wheels. He then told me that for an auto Beemer, he would prefer to tow on the front wheels because there's much less chance for damage.
He pulled my car to the next exit off the mountain freeway and then found a open space. He dropped the car and then re-positioned the tow truck to lift the rear wheels and towed on the front (the picture above).
I was really impressed by how pleasant and knowledgeable he was. He also gave me a break on the tow. Although he spent 2 hours, he billed me for less than 1 hour. Sweet! (It may have something to do with the fact that it took him almost 1/2 hour to find me on the freeway and he called me 3 times...
On the road again!
Posted: Sun Oct 25, 2015 2:41 am
by songzunhuang
Spent most of today checking over the various systems in the car. I came across a most excellent website for troubleshooting our cars.
http://www.hiperformancestore.com/Motronic.htm
Ultimately it took 4 hours to track down the fact that it was a disintegrated distributor rotor! I had thought it was a fuel issue and spent time and part replacing and checking the fuel system.
At the end of the day, I changed the following:
- Fuel Pressure regulator
Fuel Pump
Fuel lines
Breather hose
Distributor Cap
Distributor rotor
Main relay
I also checked the fuel pump and main relays, tested the speed and reference sensors, coil, fuel injectors, vacuum lines, tested fuel pressure and all the grounds.
I sure felt good to get the car running again. I immediately drove it to my favorite Chinese restaurant and picked up a dinner ToGo. I was too dirty to eat at the restaurant. Lol!
The fun never stops - Brake Bomb
Posted: Sun Nov 01, 2015 7:46 am
by songzunhuang
Today I was quite happy to get my Brake bomb changed! I read and re-read all of the tutorials on this site and they really helped. I learned a few things that I want to share with the group.
1) The crowfoot 19mm was the only one I needed. I got a set at Harbor Freight for like $10. Well worth it! I had to use this with a breaker bar. Picture below.
2) I also got the flare end wrenches from Harbor Freight. Again only about $15 for a set and well worth it.
3) I got a chain strap wrench from Harbor Freight. This does not work. The links are set such that you cannot get a good grip on the bomb. I ended up going to my neighbor (who has scads of tools) to help me get the bomb off.
4) You will need a BIG vise. Mine didn't work and I had to goto my neighbor and borrow his huge bench vise.
After the repair, I understand all the tips about which lines to do in which order and why. This job is a bit of a PITA.
It was great to see the fluid suck down as described after I swapped my bomb. I took it for a test drive and it was GREAT not to see the quick flash of the brake light on the dash. Also, the brakes felt a lot better, progressive and not hard.
Only one problem. After the test drive I stopped the car, took the cap off the reservoir to check the level by pumping the brakes. I saw a lot of air bubbles form. What does this mean? Am I in for more pain?
Posted: Sun Nov 01, 2015 11:41 am
by sansouci
Great job. Now check/ change all the flexible or rubber lines that go to the regulator. They are old based on some of your other pics.
Posted: Mon Nov 02, 2015 3:29 am
by songzunhuang
sansouci wrote:Great job. Now check/ change all the flexible or rubber lines that go to the regulator. They are old based on some of your other pics.
Hey thanks, I am slowly getting the bugs worked out. Today was another one of those days where I get a few things accomplished, but them had a step back.
I'm still working my way through all the fuel lines and I'll be getting to the other rubber hoses and such in due time. I'm trying to get a bit of a break...
I must say, the braking performance is much better since yesterday's bomb replacement.
Another almost great day!
Posted: Mon Nov 02, 2015 3:52 am
by songzunhuang
Today I decided to attack the valve adjustment. My engine seemed a little "tappy" and I wanted to see if the valves were the reason why. It's a good thing that I did this today as I discovered that one of my banjo bolts for the oil lines was completely out! It was sitting in the oil return area. This meant a trip to the auto store to get some Loctite blue. While I was there, I picked up some new NGK plugs for good measure.
Also, I used a Victor Reinz gasket that has a nice bead of a red rubber like material. It seems to me like a great part. I was getting a bit of seepage before but I think this will seal it right up.
After the valve adjustment, the car didn't sound a whole lot quieter. I guess when I drive it next week to work, I'll see if it feels any different. I will say, using the service port pins 11 & 14 to turn the motor is a brilliant way to do the valve adjustment. It makes it so much easier.
Also today, I decided to clean up the valve cover. This operation took 2 hours and I don't know if it was worth it. The cover looks nice, but after i put all of the bits back on, it's mostly covered! I also cleaned up and painted the rails supporting the intake manifold to the valve cover.
Finally, I had taken out the instrument cluster to clean up the connection and solder joints since my instruments are still pretty much all wonky. After a lot of work, I can't say that it's a whole lot better. It looks like my speedo and tach are back and also my fuel gauge is working as before. I lost the temp gauge and the economy meter and SI lights are still all wrong. I am thinking of taking the whole thing to Palo Alto Speedometer shop to have them just overhaul the whole thing. I've spent too many hours on the panel.
All in all, a pretty good day. I didn't get to my fuel line and sunroof panel liner because I ran out of time. Oh well, there's always next weekend.
Posted: Mon Nov 02, 2015 4:22 pm
by hornhospital
That banjo bolt laying in the oil return looks real familiar. I see the bolt had it's crush washers on it, and the other crush washer was still between the oil tube and the oil tube stanchion where it belongs. Mine were both down in the oil return area. An inspection of the cam/rockers/banjo bolts should be very high on the "must see" list when considering purchase of an M30-equipped BMW. Glad you caught that problem. Was there any wear on the #1 cam lobes?
Posted: Mon Nov 02, 2015 6:21 pm
by songzunhuang
hornhospital wrote:That banjo bolt laying in the oil return looks real familiar. I see the bolt had it's crush washers on it, and the other crush washer was still between the oil tube and the oil tube stanchion where it belongs. Mine were both down in the oil return area. An inspection of the cam/rockers/banjo bolts should be very high on the "must see" list when considering purchase of an M30-equipped BMW. Glad you caught that problem. Was there any wear on the #1 cam lobes?
It was the first valve I adjusted and I was wondering how long it had been oil starved. The good news is that i didn't seem the worse for wear. It was a teeny tight (out of tolerance of 0.012) but all in all no visible marks of excessive wear when compared to the others.
Today I drove the car into work (2 hour commute - not normal, but in California when it rains, people go nuts) and the car did just fine. At the end of the drive I listened to the motor for weird valve noise and it actually sounds a bit better than I recall. It's probably because #1 is actually getting oil now!
Also it's amazing how nice it feels to have brakes that respond correctly (I did the brake bomb replacement on Saturday). Oh, and I discovered my rear defroster isn't working. Oh well, low on the list of things required to use the car as a daily driver. So for now, all is well. I hope it lasts for a while.
Posted: Mon Nov 02, 2015 7:02 pm
by sansouci
Song,
You are making fantastic progress in sorting out your 6! Even better when this is your first so every job is a learning curve. Glad you're with us. I'm ashamed at how slow my resto is going.
The is a contributor, Gale something on either BC or bimmerforums who sells pre-drilled banjo bolts to safety wire them to the oil feed tube and blue loctite so that you are not relying totally on torque to prevent them from getting loose. But you can find really nice, thin wire on ebay speedway_motors or see their website that is thinner than the stuff at HF. Also a cheap pair of safetywire twister pliers or go for the best at USATCO.
I guess if you have a small drill press and good drill bits or a vertical mill, you could do the same thing.
There are some posts of polished valve covers and those who have black powder coated them while keeping the raised logo and horizontal lines in clear. All a matter where you want to spend your time and $$
Frost? Cali? Say it ain't so....
--Ken
Miscellaneous Updates
Posted: Wed Nov 04, 2015 7:16 am
by songzunhuang
So the following items aren't as major, but they all help to make the car a bit better and I thought I would capture them. So read the captions for the pictures for all the details.
1. Steering play
2. Plugs
3. Pods
4. Lighted window switches
Also. I tried to clean up the solder joints for the instrument cluster last weekend and botched it. After pondering this for a while, I think I just got impatient. I'm studying up on soldering and I think I'll give it another shot. I'm going to need a magnifying glass though. Some of the traces are really small and when things get messy, it's hard to see the condition of things.
I also noticed parts of my front suspension joints were not in such great shape with grease oozing out of the joints. Add to the next project.
Finally, I think I want a Keyless Entry system. They seem inexpensive and it would be oh so convenient! I do everything through the trunk lock now!
Posted: Wed Nov 04, 2015 8:28 am
by olympia57
Re your cam cover .
You'll have to wet sand the cast surface to get it smooth prior to polishing with a sisal mop.
I started with 220 then 600 - 800 - 1200 and then white soap on the mop.
Finish it off with Solvol Autosol metal polish.
It was a time consuming messy job .
Don
Posted: Wed Nov 04, 2015 4:07 pm
by songzunhuang
olympia57 wrote:Re your cam cover .
You'll have to wet sand the cast surface to get it smooth prior to polishing with a sisal mop.
I started with 220 then 600 - 800 - 1200 and then white soap on the mop.
Finish it off with Solvol Autosol metal polish.
It was a time consuming messy job .
Don
One day when I have lots of time, I'll attack it again. I used a wire brush attachment on a drill that I thought was pretty aggressive (estimated 50 grit!) and it still didn't get the texture all off. Thanks for the tips.
I know I'll will get to it eventually though.
The intake manifold is bugging me now..... Tried an aluminum cleaner, but I have a feeling it'll also need something more severe. One day...
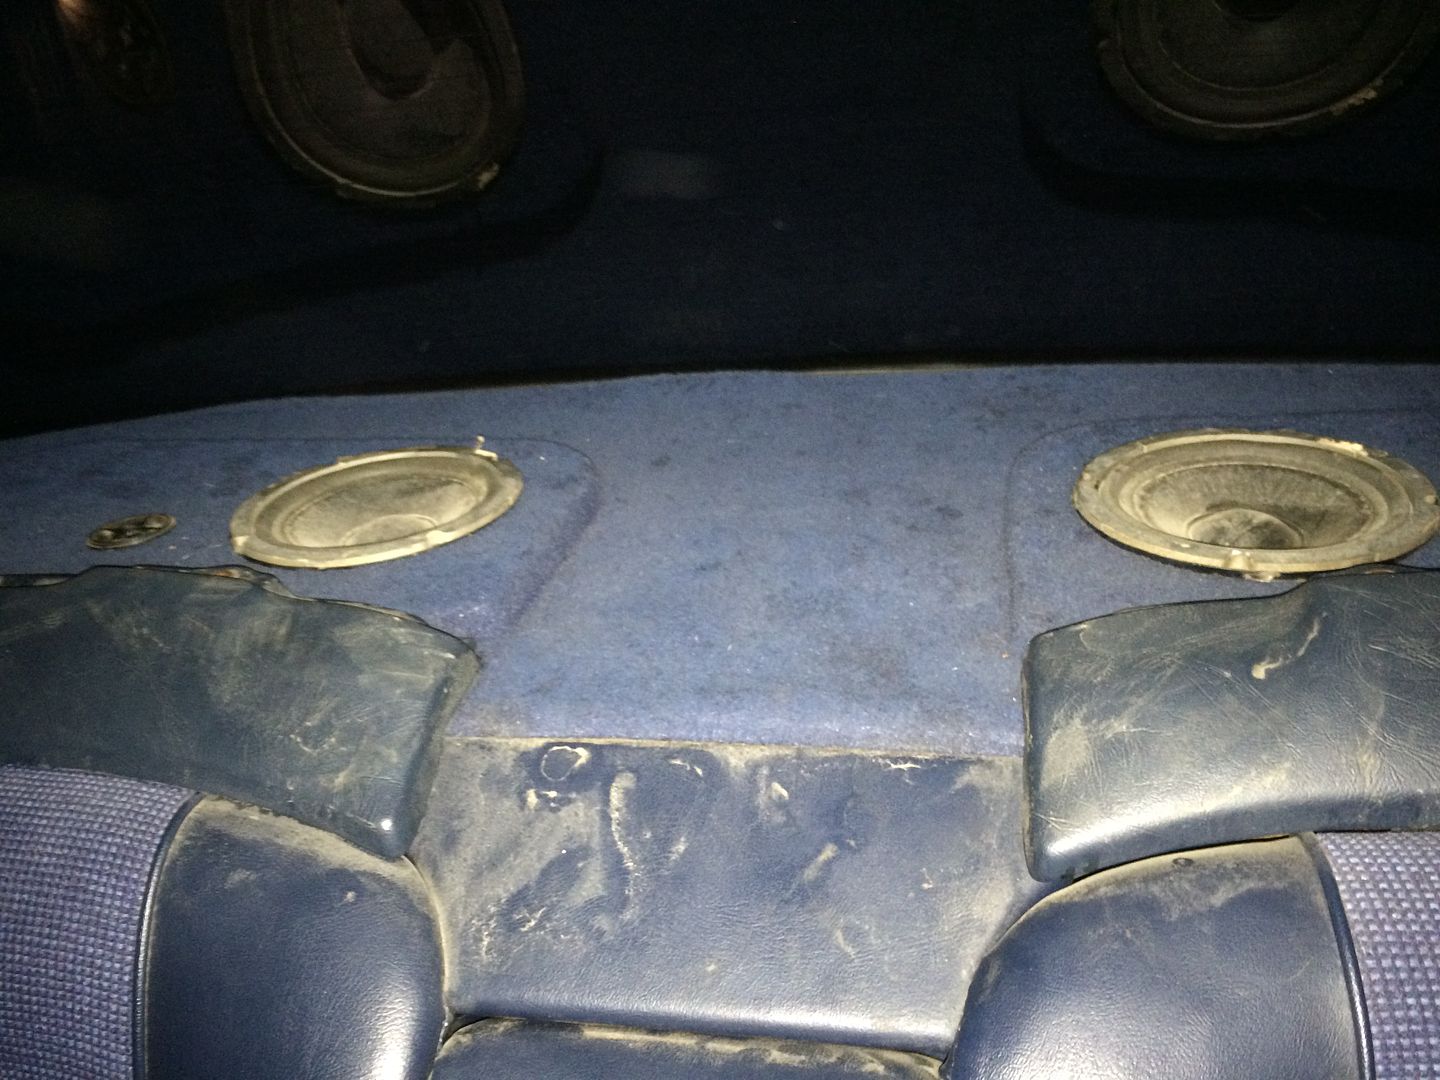
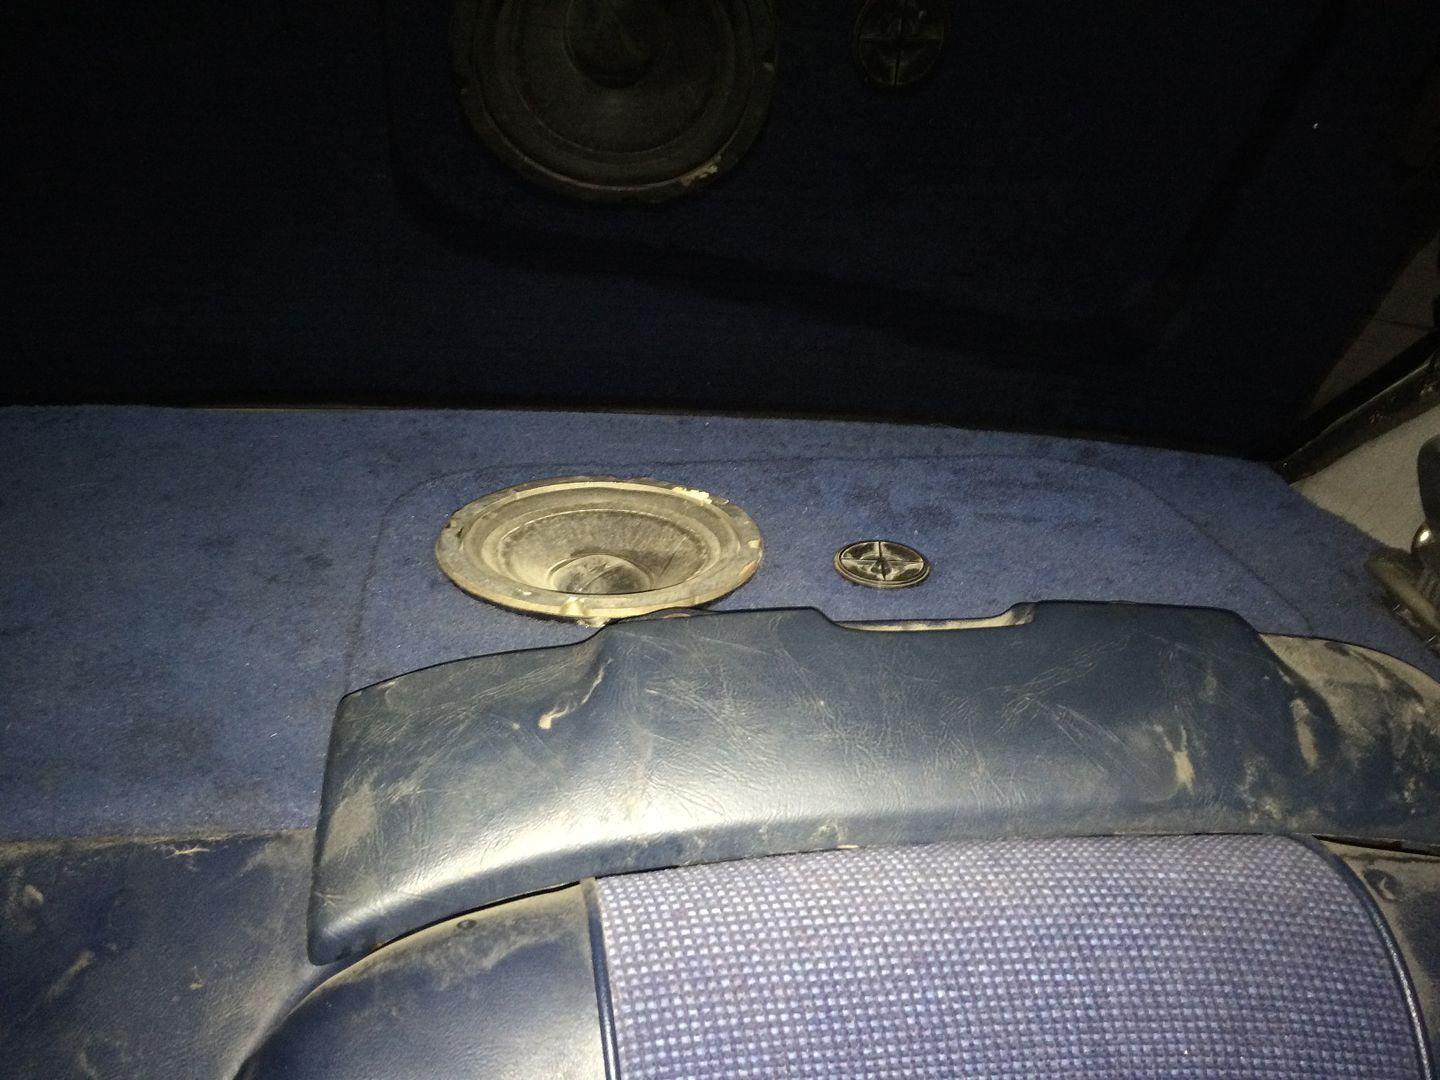
The Pod, the Pod!
Posted: Thu Nov 05, 2015 8:30 am
by songzunhuang
When started on my 6, the pods were completely messed up, I didn't know how they were supposed to operate and it was with much trial and error that I finally figured it all out. I thought I would put up a few pictures so that others who may be in the same predicament as me could understand how they are supposed to work/look. Oh, I don't have the fancy pods that fit large speakers and I don't have the fancy headrest.
Posted: Thu Nov 05, 2015 4:28 pm
by captain awesome
Hmmm. Mine is missing the pod cover but also looks like the parcel shelf is a one off? Warning: TERRIBLE NIGHT PICS
I've also cleaned up all that dust and grime since this was taken.
The Solder Job - Fixing the Instrument Cluster
Posted: Mon Nov 09, 2015 1:21 am
by songzunhuang
So last week I checked with a few Speedo shops about rebuilding my instrument Cluster. Their $400-500 estimate gave me the incentive to try again. So I purchased a few more solder supplies and went for it!
My last solder job was a disaster. I thought that re-flowing solder meant heating it up so it would flow again. Nope. Turns out that the rosin electronic solder acts as a flux and when it melts and you see smoke, the flux is gone. That means nothing stick to anything now because of oxidation on the metal surfaces. So after tons of reading and watching of Youtube, I started again.
This time the goal was to remove all traces of old solder and re-solder all the connections. These joints are small so a purchase of a soldering station with a large magnifying glass was in order. Also, de-soldering such time connections meant using a de-soldering braid. Another tip is that the soldering iron must be kept really clean. I know all of this now. Here's my adventure in pictures below.
Ah, life is good again. Instruments at 95%
Posted: Mon Nov 09, 2015 1:29 am
by songzunhuang
To make a long story short, my re-soldering job did the trick! Almost everything works again. This is the first time I've seen my instruments operate the way they should. Well, except for one thing....
My Service Indicator lights still would not go off. I tried the reset and still a yellow and 2 red lights were on. Well, I've had enough of staring at that crap. I went for a Hillbilly fix. Black electrical tape. I just put it over the LEDs. Fixed. LOL!
It'll be nice to drive the car without all the irritation of bad instruments. It remains to be seem if this takes care of the jumpy fuel gauge. I noticed that tapping on the headlight switch can still make a few things twitch. We'll see this week as I commute.
Oh, the last thing I did was the most satisfying fix. I took out the cable for the power headrest and beat it with a hammer. Such a crazy process but it worked! I have power headrests again. All good.
Posted: Mon Nov 09, 2015 1:36 am
by captain awesome
Glad you are getting things sorted. Let me know when I can send my gauges your way....
Posted: Tue Nov 10, 2015 1:35 am
by sansouci
Song,
You've got some soldering skills. Are you an EE?
Posted: Tue Nov 10, 2015 2:45 am
by songzunhuang
sansouci wrote:Song,
You've got some soldering skills. Are you an EE?
Technically I went to school as an EE but later decided I liked software and art. Yea, as in studio art. My job now is in software engineering though. I run a few teams at
http://www.equilar.com/leadership.html . You can see my profile overview on the Leadership page.
As for soldering skills, I practiced a few hours on the old SI board. Completely messed it up, but hey, it was broken anyway. Also, it was a great excuse to get a smaller soldering iron, a soldering station, etc. etc.
Coverking Dash Cover
Posted: Sun Nov 15, 2015 5:30 am
by songzunhuang
So I've been looking for a replacement dash since mine is so cracked up. I can't find anything and whatever I find is wicked expensive. So for the time being, I got a dash cover.
Overall, it's a pretty good fit but I got the one without the coin area by accident. Oh well, it still looks pretty good. According to the instructions, it's supposed to settle and fit perfectly over time.
The one I got is black polyester rug looking material. There's a bunch of velcro tabs to keep it all in place. Here's a few pictures of what it looks like on my car.
Re-keying my locks
Posted: Wed Nov 25, 2015 8:53 am
by songzunhuang
So thanks to Ralph in SoCal, I had a bunch of locks to examine as I prepared to figure out how to fix my door locks. For some reason, both my front door locks decided to stop working with my key. The key works in the ignition, glove compartment and trunk. But not in the main doors.
After about 2 hours of fiddling, I've got a lock barrel that works with my key. I just need to find time to actually take out the one in my door and replace it with the one I just set up. Hopefully I can get to this in a few days.
Posted: Wed Nov 25, 2015 11:02 am
by baders
You should have a really fun time pulling apart the door locks Song. Look up my LOCUTUS build thread for some nice pictures and a lot of swearing :)
Posted: Wed Nov 25, 2015 7:53 pm
by sansouci
Song,
In your Solder2.png, do you think this was a manufacturing defect or could this develop over time?