Wheel arch cleaning and arch liners
Moderators: GRNSHRK, ron, bfons

Wheel arch cleaning and arch liners
I understand there is a ledge on the inside of the front wings that catches mud, stones and whatever the wheels throw up. What is the best way to clean the wheel arches and the inner wing area? Somebody has also mentioned it may be possible to buy arch liners. Does anybody know where I can get these and are they worthwhile? Thanks
-
Pod
- Platinum Member

- Posts: 4493
- Joined: Tue Mar 16, 2010 8:32 pm
- Location: usually in the barn, Kent, England.
There are three major areas, although I have seen wings rust just about everywhere!
1) The easiest to see and probably the first place to go is the front mounting bracket just above the side bumper blades. You will see the bodywork bubbling from the back of the wing. This will eventually cause a hole in the inner wing too.
2) Next is anywhere along the trailing edge from the bottom of the "A" post downwards. This is when the protective panel ("covering plate" in BMW parlance) which fits between the inner & outer wings has rusted out let crud through.
3) The last and arguably most difficult place to see is the ledge which runs along the top of the inner wing, sometimes known as the Rifle Section. Crud sits on top of this and will cause corrosion to the tops of both inner and outer wings. Once this damage can be seen, by looking at the top of the outer wing where it is covered by the bonnet shut, corrosion will have advanced significantly.
As far as keeping these areas clean, I always remove as much crud as I can with my hand, then finish off with a pressure washer. In case (2) as described above, you will need to remove the plate first. Of course the best way, but one which will take quite some time is to remove the front wings, clean/repair as necessary then paint with a protective product.
Good luck!
There are many ledges and cavities within the whole area of the front wings that need to be cleaned regularly if corrosion is to be avoided.
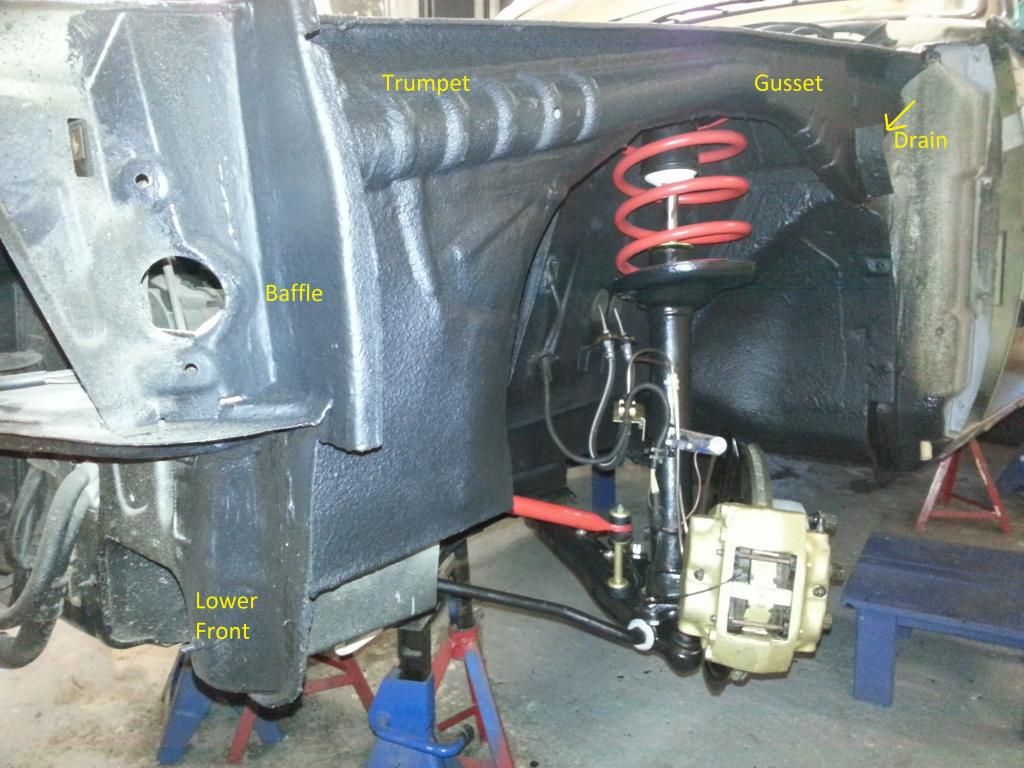
Starting at the rear there is an area ,which I call the gusset , which has a 15mm ledge that allows dirt and salt to collect . This is not visable from the outer side of the wheel arch so has to be reverse hosed to remove. In this same area is the scuttle drain that allows water to run off from the rear of the engine bay area, this requires regular hosing from inside the engine bay.
If you feel up under the wings and around the strut towers there two more 15mm ledges that run forward to the rear of the strenghening trumpets . Again regular removal of whatever collects there is necessary.
These trumpets have a convenient ledge just below the top of the wings which allows road muck to sit and solidify causing the wing seam and mounting return flange to rot.
At the front there is a " baffle " plate that can be seen inside the wing looking forward ,directly behind the indicator. There is a small gap between it and the inner surface of the wing which allows road spray behind, it then collects and rots that difficult to get area .
The mounting flange that attaches the lower wing edge to the inner wing is perfect for collecting the grit from the wash of the road spray and eventually causes rot .
The bottom of the front edge of the wings have a 12mm ledge that causes the wings to rot at that point .
The bottom of the trailing edge of the wing has a cavity between it and the sill that gets the worst of the road spray which rots out the bottom curve of the wings.
And lastly the lower front panel has a double curve below the headlights that allows detrius to build up and rot .
Bear in mind that all the inner wing surface is exposed to the spray from the road , unlike all modern cars that have plastic arch liners , and all of the above added to any general break down of the protective underseal will exacerbate and speed up corrosion once it becomes established.
The only available arch liners that I have found that are specific to the E24 are manufactured by Lokari . http://www.lokari.de/fender
I've asked for photos of the installation on the E24 but they say that none are available .
Rob ( wattsmonkey ) on here has them fitted so he would be a good contact for an opinion.
I'm in the process of adapting some full inner wing liners from another later model to give complete inner coverage . If I succeed I'll post up a how to.
I have one of these for my pressure washer which is invaluable in getting to sections similar to those that are on the E24 .
http://www.amazon.co.uk/Electric-Pressu ... gled+lance
There are lower cost ones on the market depending on what machine you have but most are a generic fit.
Good luck and hth's
Don
Starting at the rear there is an area ,which I call the gusset , which has a 15mm ledge that allows dirt and salt to collect . This is not visable from the outer side of the wheel arch so has to be reverse hosed to remove. In this same area is the scuttle drain that allows water to run off from the rear of the engine bay area, this requires regular hosing from inside the engine bay.
If you feel up under the wings and around the strut towers there two more 15mm ledges that run forward to the rear of the strenghening trumpets . Again regular removal of whatever collects there is necessary.
These trumpets have a convenient ledge just below the top of the wings which allows road muck to sit and solidify causing the wing seam and mounting return flange to rot.
At the front there is a " baffle " plate that can be seen inside the wing looking forward ,directly behind the indicator. There is a small gap between it and the inner surface of the wing which allows road spray behind, it then collects and rots that difficult to get area .
The mounting flange that attaches the lower wing edge to the inner wing is perfect for collecting the grit from the wash of the road spray and eventually causes rot .
The bottom of the front edge of the wings have a 12mm ledge that causes the wings to rot at that point .
The bottom of the trailing edge of the wing has a cavity between it and the sill that gets the worst of the road spray which rots out the bottom curve of the wings.
And lastly the lower front panel has a double curve below the headlights that allows detrius to build up and rot .
Bear in mind that all the inner wing surface is exposed to the spray from the road , unlike all modern cars that have plastic arch liners , and all of the above added to any general break down of the protective underseal will exacerbate and speed up corrosion once it becomes established.
The only available arch liners that I have found that are specific to the E24 are manufactured by Lokari . http://www.lokari.de/fender
I've asked for photos of the installation on the E24 but they say that none are available .
Rob ( wattsmonkey ) on here has them fitted so he would be a good contact for an opinion.
I'm in the process of adapting some full inner wing liners from another later model to give complete inner coverage . If I succeed
I have one of these for my pressure washer which is invaluable in getting to sections similar to those that are on the E24 .
http://www.amazon.co.uk/Electric-Pressu ... gled+lance
There are lower cost ones on the market depending on what machine you have but most are a generic fit.
Good luck and hth's
Don


Oly,
Can you describe your rust proofing methods and materials in your restoration?
Are there areas that should be vented to allow rinse and rain water to drain promptly?
--Ken
Can you describe your rust proofing methods and materials in your restoration?
Are there areas that should be vented to allow rinse and rain water to drain promptly?
--Ken
Sansouci
84 E24 633Csi Auto, Bronzit/PearlBeige 6997510
93 E32 740il M60 Auto, Alpenweis/Ultramarine
60 528i M30 5-speed Green/Beige (crushed)
71 240Z 4-speed White/Blue (rusty & sold)
65 396 Chevelle 4-speed, Marina Blue/Black (stolen)
84 E24 633Csi Auto, Bronzit/PearlBeige 6997510
93 E32 740il M60 Auto, Alpenweis/Ultramarine
60 528i M30 5-speed Green/Beige (crushed)
71 240Z 4-speed White/Blue (rusty & sold)
65 396 Chevelle 4-speed, Marina Blue/Black (stolen)
Hello Ken .
Where to begin ...........?
I' ended up replacing any section of metal that showed any signs of corrosion .
I bought the car knowing that it needed rear arches ,partial outer sills and some rear wheel tub sections . When I cut into and removed these sections I found about an inch of corrosion along the lower sections of most of the sills ( rockers ) and areas of the footwells too. That's when I decided to " do it once , do it right " .
Each section I replaced was double coated in zinc rich primer and only where the weld line or spot weld was to be was left bare . I tried two types of weld through primer but wasn't happy with the welds and decided to treat the welds afterwards . After each and every weld was linished smooth I again applied two thick coats of zinc primer and then applied two and sometimes three coats of seam sealer . The first was a PU sealer applied from a caulking gun ,smoothed off with silicone spatula ( stolen from my wife's baking cupboard ) All the underside and exposed welds had another PU coating and then I applied a top coat of brush on seam sealer using an old dried paint brush to simulate the factory applied sealer , which is very rough ! Two coats of smooth drying metal paint went on top of this and then three coats of Schutz stonechip applied on top again. I then rolled and brushed another two coats of the smooth metal paint onto the inner arches and underside because being smooth I've found that dirt tends to wash off and it is easily cleaned again . The inner sides of the outer front wings were done in the same way.
I used a material called Waxoyl to rustproof the cavities of the car . I did consider other brands but I've used Waxoyl for decades now and am quite content with it. My main areas of concern were the inner sills and wheel new rear wheel arches. As I said I'm in the process of adapting some plastic inner front wing liners for the E24 which hopefully should give total protection .
To get proper coverage whithin the sills I removed the stainless kick guard along the bottom of the doors /top of sills and drilled 4 x 3/4 holes into the top surface( these were sealed with grommets afterwards ) . This allowed much better access to the very bottom of the sill flange where three section are laminated together . Using a simple flexible attachment on the end of my Schutz gun I could get into and behind the new internal jacking point sections and between the inner membranes of the sill structure . There's nothing technical about this just wiggle it around and spray at will . I sealed up the drain holes on the sills with putty to ensure that the mix was retained until it set. Due to the fact that I didn't use weld through primer I wanted to get rust proofing mixture right down into the flanges so I diluted the Waxoyl using white spirit to a fairly runny consistancy and shot it down through the aforementioned holes using a long lance paraffin gun at a higher pressure than normal. I easily gained access to the rear of the sill under the side windows. I then shot a 50/50 mixture of waxoyl and bar and chain oil into all the cavities ,this is a good seeping mixture that finds it's way into every corner and continues to do so in warm weather .
The door bottoms were vacuumed ,cleaned and the same mix shot into them too.
Rear wheel arches were initially coated in the initial "wet" mix to get full penetration between the new flanges . I made little putty barriers to hold the mix in sections all the way round the arches gaining access from inside the boot ( trunk area and in under the side windows. This , I hope , assisted the mix to penetrate rather than run off down to the floor . The 50/50 mix was then shot into it using the flexible extension to get right to the top of the arch .I left it for a week or more to seep and set and then applied a top coat of Waxoyl slightly thinned to all the areas mentioned.
Although front inner guards will be fitted I wanted a thorough coating under the wings too so two coats were shot up behind the removable stone guards at the rear of the wings prior to them being fitted with good replacement seals. The front cavities , trumpet tops and gussets were then thoroughly coated in the thicker mix . I also shot two thick coats up between the front wing and sill ,where the wing is bolted on and down the scuttle drain from the inner engine bay .
When fitting up the car every trim hole was smeared with copper grease and then a neat run of waxoyl run down between the trim and body using a long nose oil can.
The new brake and fuel lines were sprayed and brushed .
One of the most important points to treat is the triangular section up behind the subframe mount at the rear . Each side has a removeable plastic plug here that gives access into that cavity. It IS awkward to get in there but I strongly advise you to flood that area with rustproofing agent as both mine were badly rusted and were found to be devoid of any coating when removed.Access into that cavity is only gained through those holes. I flooded mine using a mix of B&C oil and waxoyl , several times before sealing up again. I didn't spray the underside because It is easy to clean the painted surfaces only the areas up around the subframe mounts .
I made up and fitted a couple of larger splash panels for the very rear of the rear wheels. These were made from a black plastic 20 Lt drum opened out and flattened . These should cut down the amount of road spray getting thrown up into the rear bumper area without having to resort to fitting ugly mud flaps. One other area to note is the front bumper skeleton . After speaking to several owners I found that these are very prone to rusting , indeed mine had just started to suffer . I had mine dismantled for painting and fitting new better chrome so they were well coated ,as was the underside of the chrome blades.
So there we are , it's a messy , dirty , odious job but immensely satisfying at the same time , I just hope that in my tenure the sills never require welding again .....................................
The only advice I'd give re draining water is to ensure that the sunroof drains run all the way down into and through the manufactured drain holes at the base of the front sill /A piller and behind both rear wheel tubs in the boot /trunk. I found to my horror that both sides at the front terminated about three inches above the vent hole allowing water from the sunroof area to drip straight into the sill to floor section and cause the floor to rot out above the square body mount on both sides. I believe that the short drain pipes are quite common.
Hth's
Don
Where to begin ...........?
I' ended up replacing any section of metal that showed any signs of corrosion .
I bought the car knowing that it needed rear arches ,partial outer sills and some rear wheel tub sections . When I cut into and removed these sections I found about an inch of corrosion along the lower sections of most of the sills ( rockers ) and areas of the footwells too. That's when I decided to " do it once , do it right " .
Each section I replaced was double coated in zinc rich primer and only where the weld line or spot weld was to be was left bare . I tried two types of weld through primer but wasn't happy with the welds and decided to treat the welds afterwards . After each and every weld was linished smooth I again applied two thick coats of zinc primer and then applied two and sometimes three coats of seam sealer . The first was a PU sealer applied from a caulking gun ,smoothed off with silicone spatula ( stolen from my wife's baking cupboard )
I used a material called Waxoyl to rustproof the cavities of the car . I did consider other brands but I've used Waxoyl for decades now and am quite content with it. My main areas of concern were the inner sills and wheel new rear wheel arches. As I said I'm in the process of adapting some plastic inner front wing liners for the E24 which hopefully should give total protection .
To get proper coverage whithin the sills I removed the stainless kick guard along the bottom of the doors /top of sills and drilled 4 x 3/4 holes into the top surface( these were sealed with grommets afterwards ) . This allowed much better access to the very bottom of the sill flange where three section are laminated together . Using a simple flexible attachment on the end of my Schutz gun I could get into and behind the new internal jacking point sections and between the inner membranes of the sill structure . There's nothing technical about this just wiggle it around and spray at will . I sealed up the drain holes on the sills with putty to ensure that the mix was retained until it set. Due to the fact that I didn't use weld through primer I wanted to get rust proofing mixture right down into the flanges so I diluted the Waxoyl using white spirit to a fairly runny consistancy and shot it down through the aforementioned holes using a long lance paraffin gun at a higher pressure than normal. I easily gained access to the rear of the sill under the side windows. I then shot a 50/50 mixture of waxoyl and bar and chain oil into all the cavities ,this is a good seeping mixture that finds it's way into every corner and continues to do so in warm weather .
The door bottoms were vacuumed ,cleaned and the same mix shot into them too.
Rear wheel arches were initially coated in the initial "wet" mix to get full penetration between the new flanges . I made little putty barriers to hold the mix in sections all the way round the arches gaining access from inside the boot ( trunk area and in under the side windows. This , I hope , assisted the mix to penetrate rather than run off down to the floor . The 50/50 mix was then shot into it using the flexible extension to get right to the top of the arch .I left it for a week or more to seep and set and then applied a top coat of Waxoyl slightly thinned to all the areas mentioned.
Although front inner guards will be fitted I wanted a thorough coating under the wings too so two coats were shot up behind the removable stone guards at the rear of the wings prior to them being fitted with good replacement seals. The front cavities , trumpet tops and gussets were then thoroughly coated in the thicker mix . I also shot two thick coats up between the front wing and sill ,where the wing is bolted on and down the scuttle drain from the inner engine bay .
When fitting up the car every trim hole was smeared with copper grease and then a neat run of waxoyl run down between the trim and body using a long nose oil can.
The new brake and fuel lines were sprayed and brushed .
One of the most important points to treat is the triangular section up behind the subframe mount at the rear . Each side has a removeable plastic plug here that gives access into that cavity. It IS awkward to get in there but I strongly advise you to flood that area with rustproofing agent as both mine were badly rusted and were found to be devoid of any coating when removed.Access into that cavity is only gained through those holes. I flooded mine using a mix of B&C oil and waxoyl , several times before sealing up again. I didn't spray the underside because It is easy to clean the painted surfaces only the areas up around the subframe mounts .
I made up and fitted a couple of larger splash panels for the very rear of the rear wheels. These were made from a black plastic 20 Lt drum opened out and flattened . These should cut down the amount of road spray getting thrown up into the rear bumper area without having to resort to fitting ugly mud flaps. One other area to note is the front bumper skeleton . After speaking to several owners I found that these are very prone to rusting , indeed mine had just started to suffer . I had mine dismantled for painting and fitting new better chrome so they were well coated ,as was the underside of the chrome blades.
So there we are , it's a messy , dirty , odious job but immensely satisfying at the same time , I just hope that in my tenure the sills never require welding again .....................................
The only advice I'd give re draining water is to ensure that the sunroof drains run all the way down into and through the manufactured drain holes at the base of the front sill /A piller and behind both rear wheel tubs in the boot /trunk. I found to my horror that both sides at the front terminated about three inches above the vent hole allowing water from the sunroof area to drip straight into the sill to floor section and cause the floor to rot out above the square body mount on both sides. I believe that the short drain pipes are quite common.
Hth's
Don
Don,
Awesome guide as to proper restoration, even if replacing the body panels to assure minimal rust in the future.
Many thanks!
Awesome guide as to proper restoration, even if replacing the body panels to assure minimal rust in the future.
Many thanks!
Sansouci
84 E24 633Csi Auto, Bronzit/PearlBeige 6997510
93 E32 740il M60 Auto, Alpenweis/Ultramarine
60 528i M30 5-speed Green/Beige (crushed)
71 240Z 4-speed White/Blue (rusty & sold)
65 396 Chevelle 4-speed, Marina Blue/Black (stolen)
84 E24 633Csi Auto, Bronzit/PearlBeige 6997510
93 E32 740il M60 Auto, Alpenweis/Ultramarine
60 528i M30 5-speed Green/Beige (crushed)
71 240Z 4-speed White/Blue (rusty & sold)
65 396 Chevelle 4-speed, Marina Blue/Black (stolen)
You're very welcome Gav (?) I got tremendous amount of help and encouragement when I came on board , and indeed still do , so I'm sure you'll enjoy the forum.635gav wrote:Thank you Don and Pod, that's way more information than I thought I would get. I appreciate your prompt and comprehensive replies. Now to get stuck in, I'm dreading how much rust I'll find but ignorance isn't a solution!
Keep us posted on what you find and let's see a photo of your car .
Don
Re: Wheel arch cleaning and arch liners
Don - how did you get on with adapting the wing liners from another later model and fitting?
My car's just been up in the air, underneath cleaned and wax-oiled throughout. It's incredible just how much crud can build up in the front wheel arches, especially up near to the suspension towers. So I've been looking into fitting wheel arch liners, possibly Lokari ones but they are currently out of stock for my car, a 1989 M.
What they do have in stock, are plastic arch liners (front and rear) for the Volvo 240. You don't suppose it would be better ordering those and then adapting to fit, seeing as they are plastic as opposed to aluminum?
Haven't yet found any feedback though on how easy they are to fit or even adapt.
Cheers
Re: Wheel arch cleaning and arch liners
Sorry Don, just found your write up here: viewtopic.php?f=6&t=25263&p=189218&hilit=lokari#p189218
Very helpful, thank you for posting
Very helpful, thank you for posting